Arrow display triangle 14.5*19.05mm
Series No:
Weight:(g/pcs)
Dimension:(mm)
Specification:
Inquiry
Description:
LED light bar(Triangular,22.0*19.05mm)
Lightbar LED
Elevating Design with the Arrow LED Display: A New Dimension in Elevator Interfaces
The Arrow Display Triangle, measuring 14.5*19.05mm, is revolutionizing how we think about LED displays and their applications, particularly in the context of elevator interfaces. Known as “arrow LED display” and synonymous with “arrow elevator,” this innovative component is making significant inroads in the electronics industry. This article explores the features, applications, benefits, alongside case studies and user testimonials of the Arrow Display Triangle, underlining its pivotal role in enhancing electronic interfaces for manufacturers, engineers, purchasers, and administrators within the electronics domain.
Features and Applications
The Arrow Display Triangle 14.5*19.05mm, with its distinctive shape and compact size, offers unparalleled versatility and utility. Primarily used in “elevator displays,” its applications extend beyond, serving as an integral component in various electronic devices requiring directional indicators or aesthetic enhancement.
Applications include:
- Elevator Panels: Improving user navigation and efficiency.
- Automotive Displays: Offering clear directional signals.
- Consumer Electronics: Enhancing interface design with intuitive indicators.
Benefits of the Arrow LED Display
Integrating the Arrow LED Display into electronic designs offers numerous advantages:
- Design Flexibility: Its unique triangular shape allows for innovative design applications.
- Energy Efficiency: LED technology is known for its low power consumption, making it an eco-friendly choice.
- Durability: LEDs have a longer lifespan, reducing the need for frequent replacements.
- Enhanced User Experience: The bright, clear display improves visibility and user interaction.
Case Studies
A notable case study involves a major elevator manufacturer that incorporated the Arrow LED Display into their new line of elevator panels. This integration significantly improved user experience by providing clear, intuitive directional signals, which was corroborated by a notable decrease in user errors and an increase in positive feedback.
User Testimonials
Feedback from users further emphasizes the impact of the Arrow Display Triangle. An electronics design engineer noted, “The Arrow LED Display has transformed our product interfaces, making them more user-friendly and visually appealing.” Another testimonial from a building administrator highlighted the enhanced functionality and aesthetic value the displays added to their elevators, contributing to a more positive user experience.
Conclusion: A Bright Future for Arrow LED Displays
The Arrow Display Triangle LED is at the forefront of technological innovation in electronic displays, offering a blend of aesthetic appeal, functionality, and efficiency. For those in the electronics field, this component not only presents an opportunity to enhance product designs but also to improve the end-user experience significantly.

Features
- Display Area Shape: Triangular, providing a unique and visually interesting area for illumination.
- Display Area Number: Features a single display area.
- Reflector Dimensions: Length of 22.0mm and width of 19.05mm, offering a moderately compact form factor.
- Uniform Light Emitting Area: Ensures consistent and even lighting across the entire display.
- Low Current Operation: Energy-efficient, leading to reduced power consumption.
- Wide Viewing Angle: Allows the light to be easily visible from various angles.
- Easily Mounted on P.C. Boards: Designed for straightforward integration into electronic systems.
- Flush Mountable: Can be installed to align seamlessly with the mounting surface.
- Excellent On/Off Contrast: Provides clear visibility, enhancing the distinction between the illuminated and non-illuminated states.
- Can be Used with Panels and Legend Mounts: Versatile in terms of installation, suitable for various types of panels.
- Categorized for Luminous Intensity: Ensures uniform brightness across different units.
- Different Colors in One Unit Available: Offers flexibility in display colors, enhancing customizability.
- Standard: Black Face, White Segment: Classic and clear appearance for easy readability.
- RoHS Compliance: Meets environmental and safety standards.
Applications
- Unique Indicator Lights: Ideal for applications requiring distinctively shaped indicator lights for both aesthetic and functional purposes.
- Control Panels: Suitable for use in control panels where a triangular light can symbolize specific functions or statuses.
- Directional Signal Lights: Can be used as arrow or directional indicators in various settings, especially where the triangular shape can convey direction or movement.
- Instrumentation Displays: Useful in specialized instrumentation panels that require unique light forms.
- Decorative Lighting: Can be integrated into design elements where triangular lighting adds a distinctive aesthetic value.
- Safety and Emergency Equipment: Appropriate for use in safety devices where unique light shapes can convey specific warnings or statuses.
- Information Displays: Effective in areas or systems where a triangular light display provides a unique method of communication.


Electrical-optical characteristics:
Article No | Emitting Color | Material | Peak Wavelength (nm) | Voltage typ. (v) | Voltage max. (v) | Luminous min | Luminous typ |
|---|---|---|---|---|---|---|---|
BL-AT1Z20B |
ultra Blue |
InGaN/SiC |
470 |
4.2 |
16 |
20 |
|
BL-AT1Z20D |
Super Red |
GaAlAs/DH |
660 |
2.2 |
20 |
24 |
|
BL-AT1Z20E |
Orange |
GaAsP/GaP |
635 |
2.5 |
6 |
10 |
|
BL-AT1Z20G |
Green |
GaP/GaP |
570 |
2.5 |
6 |
10 |
|
BL-AT1Z20H |
Red |
GaP/GaP |
700 |
2.6 |
0.6 |
2 |
|
BL-AT1Z20PG |
Ultra Pure Green |
InGaN/SiC |
525 |
4.2 |
16 |
30 |
|
BL-AT1Z20S |
Hi Red |
GaAlAs/SH |
660 |
2.2 |
6 |
14 |
|
BL-AT1Z20UB |
ultra Blue |
InGaN/SiC |
470 |
4.2 |
20 |
32 |
|
BL-AT1Z20UE |
Ultra Orange |
AlGaInP |
630 |
2.5 |
12 |
28 |
|
BL-AT1Z20UG |
Ultra Green |
AlGaInP |
574 |
2.5 |
12 |
20 |
|
BL-AT1Z20UR |
Ultra Red |
GaAlAs/DDH |
660 |
2.2 |
25 |
48 |
|
BL-AT1Z20UW |
Ultra White |
InGaN |
- |
4.2 |
50 |
||
BL-AT1Z20UY |
Ultra Yellow |
AlGaInP |
590 |
2.5 |
12 |
28 |
|
BL-AT1Z20Y |
Yellow |
GaAsP/GaP |
585 |
2.5 |
6 |
8 |
Package configuration & Internal circuit diagram
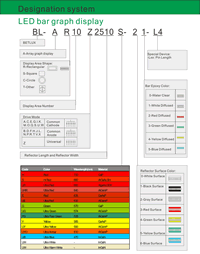
Partno description:
Related Information
Applied for:


1. Application
The Seven Segment LED is widely applied for ordinary electronic equipment (such as office equipment,
communication equipment and household applications). Checking with BETLUX’s Sales in
advance for information on applications in which exceptional reliability is required, particularly
when the failure or malfunction of the LEDs may directly jeopardize life or health (such as in
aviation, transportation, traffic control equipment, medical and life support systems and safety
devices).
2. Storage
The storage ambient for the Seven Segment LED should not exceed 30℃ temperature or 70% relative humidity.
For extended storage out of their original packaging, it is recommended that the Seven Segment LEDs be stored
in a sealed container with appropriate desiccant, or in a desiccator with nitrogen ambient.
3. Cleaning
Avoid using any unspecified chemical solvent to clean LED . For example, Trichloroethylene, Chlorosen, Acetone, and Diflon S3MC.
Any cleaning method can only be taken under normal temperature in one minute or less if it is required.
Use water to clean the Seven Segment LED if necessary under room temperature
dry it immediately after that.
4.Forming
Any unsuitable stress applied to the epoxy may break bonding wires in LED
Any forming on lead pin must be done before soldering, not during or after soldering.
Avoid applying any stress to resin in order to prevent the epoxy fracture and break on bonding wire.
While forming, please use a tie bar cut or equivalent to hold or bend the pin.
2mm from the base of resin is the minimum distance for the place bending the lead pin.
Avoid bending the lead pin at the same point twice or more.
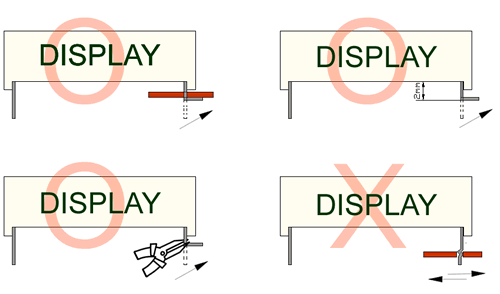
Soldering
When soldering, leave a minimum of 2mm clearance from the base of the base of the lens to the soldering point. Dipping the lens into the solder must be avoided.
Do not apply any external stress to the lead frame during soldering while the LED is at high temperature.
Recommended soldering conditions:
| IR Reflow Soldering (for SMD display) | Wave Soldering | Soldering Iron | |||
| Pre-Heat | 150-180°C | Pre-Heat | 100°C Max. | Temperature | 300°C Max. |
| Pre-Heat Time | 120sec Max. | Pre-Heat Time | 60sec Max. | ||
| Peak Temperature | 260°C Max. | SolderWave | 260°C Max. | Soldering Time | 3sec Max.(one time only) |
| Soldering Time | 10 sec Max. | Soldering Time | 5sec Max. | ||
Note: Excessive soldering temperature and/or time might result in deformation of the LED lens or failure of the LED
ESD(Electrostatic Discharge)
Static Electricity or power surge will damage the LED.
Suggestions to prevent ESD (Electrostatic Discharge):
n Use a conductive wrist band or anti-electrostatic glove when handling these LEDs
n All devices, equipment, and machinery must be properly grounded
n Work tables, storage racks, etc. should be properly grounded
n Use ion blower to neutralize the static charge which might have built up on surface of the LED’s
plastic lens as a result of friction between LEDs during storage and handling
ESD-damaged LEDs will exhibit abnormal characteristics such as high reverse leakage current,
low forward voltage, or “no light on” at low currents. To verify for ESD damage, check for “light on”
and Vf of the suspect LEDs at low currents.
The Vf of “good” LEDs should be>2.0V@0.1mA for InGaN product and >1.4V@0.1mA for AlInGaP
product.

LED dirve IC by Maxim Integrated
MAX6959 4½-Digit LED Display Driver
MAX6958 4½-Digit LED Display Driver
MAX6955 7-, 14-, 16-Segment LED Display Driver
MAX6956 LED Static Display Driver and I/O Port
MAX6954 7-, 14-, 16-Segment LED Display Driver
MAX6952 5 x 7 Matrix LED Display Driver
MAX6957 LED Static Display Driver and I/O Port
MAX6950 5-Digit LED Display Driver
MAX6951 8-Digit LED Display Driver
ICM7212 4-Digit LED Driver
ICM7212A 4-Digit LED Driver
ICM7212AM 4-Digit LED Driver
ICM7212M 4-Digit LED Driver
ICM7218A 8-Digit LED Driver
ICM7218B 8-Digit LED Driver
ICM7218C 8-Digit LED Driver
ICM7218D 8-Digit LED Driver
MAX7221 8-Digit LED Display Driver
MAX7219 8-Digit LED Display Driver
When selecting power for LED systems, it’s essential to understand several key parameters to ensure safe operation, longevity, and optimal performance. Here are some steps and considerations for LED power selection:
- Determine the Forward Voltage (Vf) of the LED(s):
Each LED has a forward voltage, which is the voltage at which the LED operates when the current is flowing through it. This value can typically be found in the LED’s datasheet.
- Determine the Forward Current (If) of the LED(s):
The forward current is the current at which the LED is designed to operate. Running an LED at higher than its rated current can reduce its lifespan and increase the heat it produces.
- Decide on the Configuration:
Series Configuration: When LEDs are connected in series, the forward voltages add up, but the current remains the same.
Parallel Configuration: When LEDs are connected in parallel, the forward voltage remains the same, but the currents add up. This configuration can be risky because if one LED fails or has a slightly lower forward voltage, it can cause the other LEDs to draw more current.
Calculate Total Power Requirements:
Power (W) = Total Forward Voltage (V) x Total Forward Current (A)
For example, if you have three LEDs connected in series, each with a forward voltage of 3V and a forward current of 20mA, the total power requirement would be:
Power = (3V + 3V + 3V) x 20mA = 9V x 0.02A = 0.18W
- Select an Appropriate Power Supply:
- Voltage Rating: The power supply voltage should match or slightly exceed the total forward voltage of your LED configuration.
- Current Rating: The power supply’s current rating should meet or exceed the total forward current of your LED configuration.
- Safety Margin: It’s a good practice to select a power supply that can provide at least 20% more power than your calculated requirement. This ensures the power supply isn’t operating at its maximum capacity, which can extend its life and ensure safer operation.
- Consider Additional Features:
- Dimming Capability: If you want to control the brightness of your LEDs, choose a power supply with dimming capabilities.
- Overcurrent and Overvoltage Protection: To protect your LEDs, select a power supply with built-in protection mechanisms.
- Thermal Management: Ensure that the power supply has adequate cooling, especially if it will be enclosed or in a location with limited airflow.
- Regulation and Efficiency:A power supply with good regulation will maintain a consistent voltage output despite variations in the load. High efficiency ensures minimal power is wasted as heat.
- Physical Size and Form Factor:Depending on where you plan to place the power supply, its size and shape may be critical factors.
In summary, when selecting power for LED systems, understanding your LED’s requirements and the configuration you plan to use is essential. Then, pick a power supply that meets those needs with some added safety margin, keeping in mind any additional features or constraints relevant to your project.
Here are some well-regarded brands in the industry:
- Mean Well: One of the most recognized brands in the LED power supply industry, Mean Well offers a wide range of products suitable for both indoor and outdoor applications. Their units often come with features like overcurrent protection, dimming capabilities, and high efficiency.
- Tridonic: A global leader in lighting technology, Tridonic offers LED drivers and power supplies that cater to various lighting solutions, from simple setups to advanced smart lighting systems.
- Philips Advance Xitanium: Philips is a well-known brand in the lighting industry, and their Xitanium series of LED drivers are known for reliability and performance. They cater to both indoor and outdoor LED applications.
- Osram: Another giant in the lighting industry, Osram offers a range of LED drivers and power supplies suitable for various applications, including architectural and street lighting.
- LIFUD: Specializing in LED drivers, LIFUD is known for its high-quality products that cater to both commercial and residential LED lighting solutions.
- MOSO: This brand offers a variety of LED drivers, especially for outdoor and industrial applications. Their products are known for durability and performance.
- TDK-Lambda: With a history in power electronics, TDK-Lambda offers a range of power supplies and LED drivers suitable for various applications, emphasizing reliability and advanced features.


